

Infrastructure as Code with aws-cdk
Recently Amazon Web Services announced the general availability of the Cloud Development Toolkit or aws-cdk. The aws-cdk is Amazons take to create a Framework for imperative Infrastructure as Code instead of declarative IaC (like CloudFormation). And bake some common best practices and use cases into the Framework.
Different Programming Languages
The aws-cdk ist built using another tool created by aws called jsii. Jsii is able to create packages for different programming languages from TypeScript or JavaScript code. This allows people to consume the aws-cdk packages using npm or pip. While there are more languages available, only Python and TypeScript were made generally available at the announcement (July 2019).
You can find out more about the other languages which are still in development preview here.
What can it do?
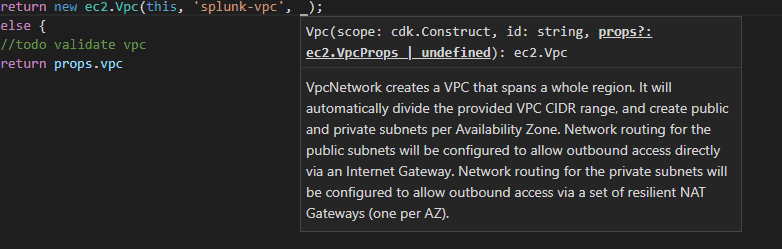
I started working with the aws-cdk tools a view months ago when I was looking for a way to create subnets dynamically depending on the region you are deploying to. I was instantly amazed by the simplicity the new approach has over traditional CloudFormation templates. The generation of a multi availability zone VPC Network with a private and public subnets is done in one simple line. The following TypeScript code creates a VPC witch spans up to 3 AZs, a private and a public subnet including a NAT-Gateway in every AZ.
const vpc = new ec2.Vpc(this, 'main-network');There are more higher level constructs like a EKS(Elastic Kubernetes Service) cluster or a database instance. You can find some examples here.
The main benefit of those reusable constructs is that they are very intentional to use for everybody that has worked with a object oriented programming language. You create a new instance of something, it requires some parameters to be configured. You can alter the instance using methods. Documentation and intelligent auto completion work as expected.
The language itself provides static code analysis which tell you what is required and missing.
Creating reusable Constructs yourself
It is also possible to create these higher level constructs by yourself, you can either create the constructs in just the language you use or you can use jsii to create packages for multiple languages like aws does for the aws-cdk.
To create a custom Construct you just need to extend the *cdk.Construct *class. If your construct has some configurable parameters you create a interface for those. The following example shows a empty custom construct in TypeScript
export interface CustomConstructProps {
  readonly someParameter: string
}

export class CustomConstruct extends cdk.Construct {
  constructor(scope: cdk.Construct, id: string, props: CustomConstructProps) {
    super(scope,id)
    //READY TO GO
  }
}
To get some practical experience with the aws-cdk I decided to create a construct which creates a self healing bastion host, which automatically attaches to a elastic IP.
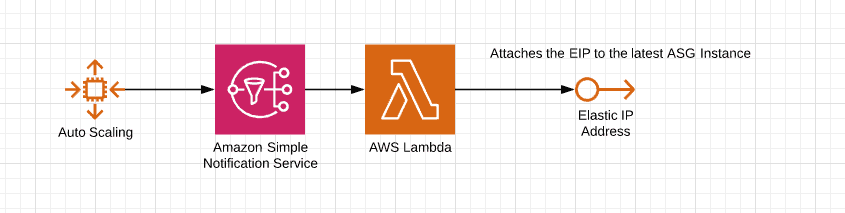
The Bastion Host Construct
To create a bastion host that is self healing in case of AZ or host failure I create a Auto Scaling Group which notifies a lambda Function to attach a fixed Elastic IP to the latest instance of the ASG.
I will go through all the required code (in TypeScript) to create this construct. But if you are just interested in using this construct, take a look at our open source construct library on GitHub. It contains the complete implementation ready to use as npm and pip package.
Lets get started and create a Interface that defines all properties required for the new construct.
export interface BastionHostProps {
   readonly vpc: ec2.IVpc
   readonly instanceType?: ec2.InstanceType;
   readonly image: ec2.IMachineImage;
   readonly peers: ec2.IPeer[];
   readonly keyName: string;
 }
The ec2.IPeers interface is used to describe a security group source. The parameter peers is used to define from which source or sources the bastion host should accept connections. The other parameters should be self-explanatory for everybody that has worked with aws.
Next we create a method that builds the security group that grants access to our host from one or many peers. We can use loops or iterators to deal with arrays.
 private createAllowExternSshSG(vpc: ec2.IVpc, peers: ec2.IPeer[]): ec2.SecurityGroup {
    const sshSecurityGroup = new ec2.SecurityGroup(this, 'allow-ssh-external-SG', {
      vpc: vpc
    })

    peers.forEach(peer => {
      sshSecurityGroup.addIngressRule(peer, ec2.Port.tcp(22))
    });

    return sshSecurityGroup
  }
We need another security group which is used by the instances we plan to access, this security group allows ssh connections between itself.
  private createAllowInternalSshSG(vpc: ec2.IVpc): ec2.SecurityGroup {
    const securityGroup = new ec2.SecurityGroup(this, 'allow-ssh-internal-SG', {
      vpc: vpc
    })

    securityGroup.addIngressRule(securityGroup, ec2.Port.tcp(22))
    return securityGroup
  }
To prepare everything required for the lambda function and the ASG we need to create the Simple Notification Service topic and the elastic IP. The constructor of our class will look something like this:
    const externalSshSG = this.createAllowExternSshSG(props.vpc, props.peers)
    const internalSshSecurityGroup = this.createAllowInternalSshSG(props.vpc)
    const snsTopic = new sns.Topic(this, 'autoscaling-notifications')
    const externalIp = new ec2.CfnEIP(this, 'bastionhost-ip')
Our lambda function needs a Role that is able to associate the elastic IP with an instance. The API Action required is called AllowAssociateAddress.
 private createLambdaRole(): iam.Role {
    const lambdaDocument = new iam.PolicyDocument();
    const associateAddressStatement = new iam.PolicyStatement();
    associateAddressStatement.addActions("ec2:AssociateAddress");
    associateAddressStatement.addResources();
    const logStatement = new iam.PolicyStatement()
    logStatement.addActions("logs:CreateLogGroup", "logs:CreateLogStream", "logs:PutLogEvents");
    logStatement.addAllResources()
    lambdaDocument.addStatements(associateAddressStatement, logStatement);

    return new iam.Role(this, "LambdaExecutionRole", {
      assumedBy: new iam.ServicePrincipal("lambda.amazonaws.com"),
      inlinePolicies: {
        "AllowAssociateAddress": lambdaDocument
      }
    })
  }
The aws-cdk supports different options to deal with lambda code. You can learn more about them at the Documentation. I choose to go with inline code as the code is very short and i can use the TypeScript template string feature to put the public IP address into the source code.
 private createLambdaCode(publicIpAddress: string): lambda.Code {
    return lambda.Code.inline(`
    var AWS = require('aws-sdk');
    AWS.config.update({region: 'eu-central-1'});

    exports.handler = (event,context,callback) => {

        console.log(event.Records[0].Sns.Message)
        const message = JSON.parse(event.Records[0].Sns.Message);
        console.log(message.Event)

        if(message.Event === "autoscaling:EC2_INSTANCE_LAUNCH")
        {
            const instanceId = message.EC2InstanceId
            var ec2 = new AWS.EC2({apiVersion: '2016-11-15'});
            console.log(\`associate Address \${instanceId} with ${publicIpAddress}\`);
            ec2.associateAddress({
                InstanceId: instanceId,
                PublicIp: "${publicIpAddress}"
            }, function(err,data) {
                if(err)
                {
                    callback(err)
                }
                else
                {
                    callback(null,data)
                }
            })
        }
    };
`)
}
Now we can create the lambda function resource, attach it to the topic we created earlier and add the code and the role to it.
 private createLambda(topic: sns.ITopic, ip: string) {
    new lambda.Function(this, "AutoScalingAttachIpLambda", {
      events: [new eventSources.SnsEventSource(topic)],
      code: this.createLambdaCode(ip),
      runtime: lambda.Runtime.NODEJS_8_10,
      handler: "index.handler",
      role: this.createLambdaRole()
    })
  }
As last resource we create the ASG with all the prepared settings. And add the security groups we created earlier to it.
 const asg = new autoscaling.AutoScalingGroup(this, 'bastion-selfheal-ASG', {
      vpc: props.vpc,
      allowAllOutbound: true,
      associatePublicIpAddress: false,
      keyName: props.keyName,
      notificationsTopic: snsTopic,
      instanceType: props.instanceType ? props.instanceType : new ec2.InstanceType('t3.micro'),
      machineImage: props.image,
      vpcSubnets: props.subnets ? props.subnets : {
        onePerAz: true,
        subnetType: ec2.SubnetType.PUBLIC
      }
    })

    asg.addSecurityGroup(externalSshSG)
    asg.addSecurityGroup(internalSshSecurityGroup)
As final step we define the security group and public IP as properties inside the class to make them available to the user of the construct.
  readonly internalSshSecurityGroup: ec2.ISecurityGroup
  readonly publicIp: string
The final version of our constructor looks like the following snippet.
  constructor(scope: cdk.Construct, id: string, props: BastionHostProps) {
    super(scope, id)

    const externalSshSG = this.createAllowExternSshSG(props.vpc, props.peers)
    this.internalSshSecurityGroup = this.createAllowInternalSshSG(props.vpc)
    const snsTopic = new sns.Topic(this, 'autoscaling-notifications')
    const externalIp = new ec2.CfnEIP(this, 'bastionhost-ip')

    this.publicIp = externalIp.ref
    this.createLambda(snsTopic, externalIp.ref)
    const asg = new autoscaling.AutoScalingGroup(this, 'bastion-selfheal-ASG', {
      vpc: props.vpc,
      allowAllOutbound: true,
      associatePublicIpAddress: false,
      keyName: props.keyName,
      notificationsTopic: snsTopic,
      instanceType: props.instanceType ? props.instanceType : new ec2.InstanceType('t3.micro'),
      machineImage: props.image,
      vpcSubnets: props.subnets ? props.subnets : {
        onePerAz: true,
        subnetType: ec2.SubnetType.PUBLIC
      }
    })

    asg.addSecurityGroup(externalSshSG)
    asg.addSecurityGroup(this.internalSshSecurityGroup)
  }
This is it, you can find the complete source of the BastionHostConstruct.ts on GitHub. Usage could look something like the following:
    const network = new ec2.Vpc(this, 'main', {
      maxAZs: 1
    })

    const bastionHost = new vlib.BastionHost(this, 'bastionHost', {
      image: new ec2.AmazonLinuxImage(),
      peers: [ec2.Peer.anyIpv4()],
      vpc: network,
      keyName: 'raphaels-key'
    })
As mentioned at the beginning, the bastion host construct is available as npm and pip package via our aws-cdk-library. If you have any questions, problems or are interested in some other construct, create a issue over here.